 NIMIQ.TOP
NTMP: How It Actually Works
The release of the Nimiq Transaction Messaging Protocol (NTMP) was a success and drew so much attention, that working on the NTMP specification became a higher priority than making the next release for the Nimiq Release Week (sorry!)
One message approval, many transactions#
But the Nimiq community was asking how all this actually works and what’s the magic happening, so that only one proof is requested instead of letting the user sign every single message fragment. And the community is right, there’s still missing an easy-to-understand explanation and visualization on the basics. Let’s start with a rough introduction.
Instead of signing every transaction of every single message fragment, NTMP is creating a proof of the complete message - including meta-data of its fragments. The user creates one transaction containing that proof and funds another address, which is now controlled by the Nimiq Client in-browser to send these transactions to its destination addresses. That’s the whole magic in a more compact explanation.
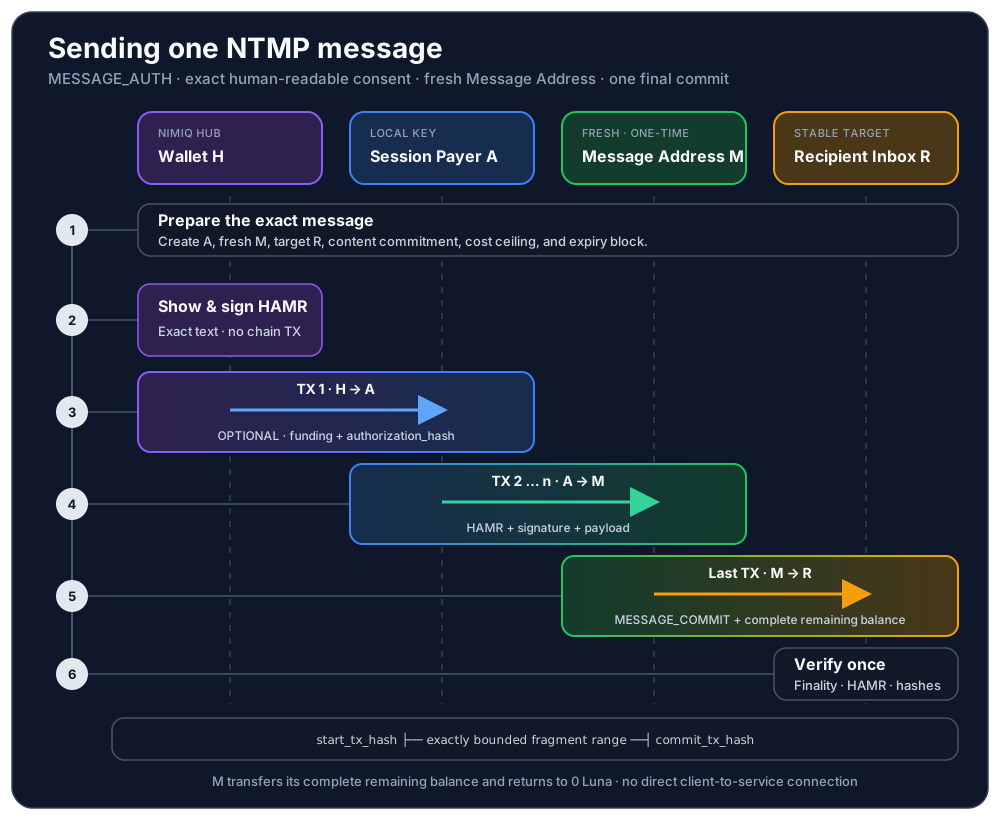
So this is the steps it takes to send a message from the Nimiq Hub or the Nimiq Pay app to the receiver:
Why all these steps ?#
But why are all these steps necessary? If a message consists of more than a specific amount of bytes, it needs to be split into fragments / their own transactions. That means that the user would have to approve more than one transaction in Hub or Pay - a UX nightmare. That’s why a „Session Payer“ address is funded, where the rest of the fragments / transactions will be sent from. But now there are 2 more problems: 1. How are the transactions from that address sent? 2. And if it’s a new address, how does the receiver know that the received message was really sent from the real sender?
Sending from another address is done by adding the Nimiq Client JavaScript Library into the app and by creating the address and send the transactions from there, which doesn’t need user interaction, as the library has access to the newly created account’s private key.
How does the receiver verify the real sender? The first transaction which sends the Session Payer address contains the "proof" of the message to be delivered.
Why so many addresses ?#
But now there’s 4 addresses involved into sending a message. But that’s great - NTMP uses this inconvenience for better readability and traceability across the blockchain. The Session Payer address enables 1. the message to be only approved once in Hub or Pay and 2. to later have active, authenticated sessions between the sender and the receiver which makes two-way communication available.
The Message Address is needed, as the blockchain doesn’t allow the sender to also be the receiver of a transaction to send the message fragments. This also brings pros for readability and traceability. Every sent message is on its own opaque address, so there’s a clear cut between every single message.
The complete message flow#
Here’s a compact, very basic and incomplete guide to make it more clear how it really works (examples and a reference implementation are on its way, don’t worry):
Sender / Client:
1. Have a big message to send
2. Split it into fragments
3. Create a proof of the whole message and let the user sign (signTransaction())
4. Create a new address (Session Payer) with the Nimiq Client [1]
5. Let the user approve a send of one transaction with enough funds for all fragment transactions to the newly created address
6. Create another new address (Message Address)
7. Send all message fragments from „Session Payer“ to „Message Address“ with Nimiq Client
8. Finally, send a finalizing message to the Recipient Inbox Address
Recipient:
1. Listen for new transactions on the Recipient Inbox Address
2. On new message, load all transactions from the Sender’s address (the Message Address)
3. Reassemble the message from all its fragments
4. Read the proof from the message (by reading it from the the first fragment’s sender address - which points to the Session Payer Address)
5. Check signatures, proofs, etc.
Note that this is a one-way, single use connection only. It takes some more steps to have an open session and two-way communication. Coming soon!
Done! If you have more questions, remarks, ideas, feedback, etc. please consider doing so by contacting the nimiq.top team at [hi@nimiq.top](mailto:hi@nimiq.top) or find us on the official Nimiq Discord server in the #nim-re_pool channel.
- The Nimiq Client JavaScript Library needs to be loaded and the consensus needs to be established. Plus, you have full control of these addresses, without the user needed to sign or send message, as you have the private keys. ↩